Sunday, September 4, 2016

Creation Station: Holiday Catalog Faves!


Happy Sunday everyone!  It's the first Sunday of the month and we know what that means!!!  Time to hop along with the Creation Station!  This month we are highlighting our Holiday Catalog favorites. 

I have a really quick project to start you off....


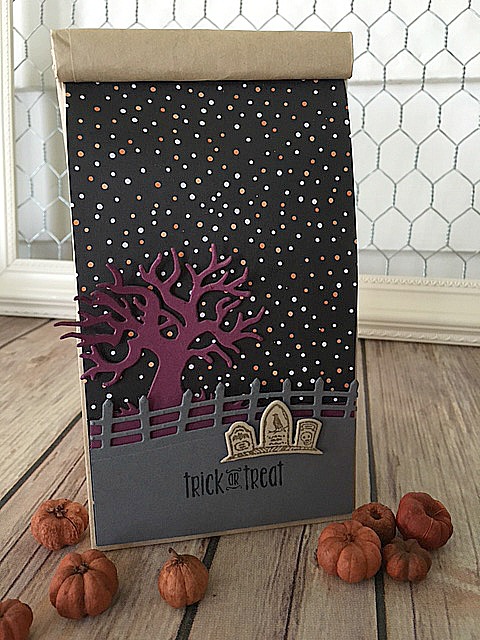
I happen to love these Petite CafĂ© Bags.....they are perfect for small and even large treats.  Plus, they are so easy to decorate - my kids can help with these for Halloween treats at school.  For today's project I used the Spooky Fun Bundle.  I can imagine a lot of ways that I can use these dies for some great Halloween Packaging. 

I doubled up my Rich Razzleberry tree, because I wanted to be able to bend the branches to make it pop off the project in a 3D way.  Doubling the cardstock gave it more staying power.  I popped up all the layers with Stampin' Dimensionals to create more depth.  Doesn't the pattern of the Halloween Night DSP look like a night sky?  You could easily add some ribbon to the top and a cute little tag if you wanted to jazz this up even more - or to personalize it a bit more.  I wanted to keep this simple tho - especially if I want my kids to be able to help with this for school....


My next project is this little ditty.....


Many of you know that I've been transitioning over to a sign making business - The Old White Shed (you can find me on Instagram and Etsy).  This is one that I'll be creating for Christmas
 I used felt for the branches and pinecones and die cut using the Pretty Pines Thinlits.  You'll want to use some fabric stiffener on the felt first as it's too delicate for the dies.  The dies are too intricate - trust me - the felt will just fall apart if you don't use the stiffener.  I love the fact that I can use Stampin' Up! products for my signs too - it's wonderfully versatile that way.  I often use our dies to create flowers and leaves - whether I use them for my signs or banners, etc.   I also used some of our mini jingle bells for berries.....they were the perfect size.

http://www.becreativewithnicole.com/?p=11259&preview=true

http://thecraftyoinkpen.blogspot.com/2016/09/creation-station-blog-hop-autumnwinter.html


Sunday, July 3, 2016

Creation Station: Gifts from the Garden


Howdy Crafty Friends!  I hope all of you that are in the US are enjoying your Independence weekend.  And the rest of you - I hope you are having a great weekend too!  Our banner really seems patriotic and seasonal - with many thanks to our own Cindy Schuster.

This month we are focusing on Gifts from the Garden - and those can be any type of garden-y gifts, flowers, veggies, you name it.  I'm a "canner," as my hubby refers to me (with more sarcasm than love!).  In fact we have a group of us that get together every summer, compile our garden goodies and can as much as we can - usually until we run out of jars!  We try our luck with about everything - from jams to pickles to spaghetti sauce and salsa.  It's always good to see my cellar shelves stocked full of yummy stuff that we can eat all winter long.....and sometimes longer!

So....I naturally went with some canned goods as my "Gifts from the Garden".


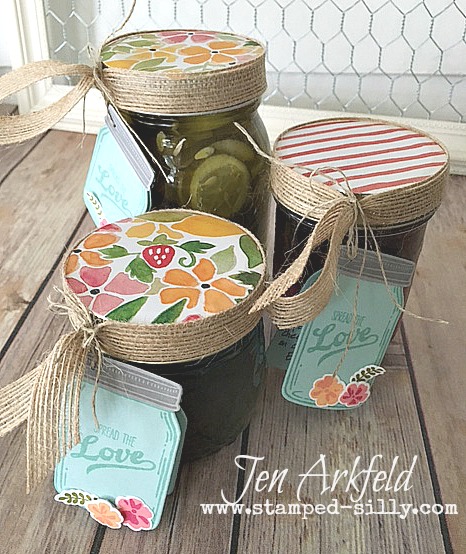
These were so fun  - and pretty simple to "spruce up." I created some little jar tags from the Jar of Love set and Everyday Jars Framelits.  There is a super simple way to create a folding tag with your dies.  Cut your paper twice as long (or wide) as you need and score in half.  For this tag, I needed a piece of Pool Party cardstock that was 2"x6", then scored at 3".  Then, take this mini card and die cut it by leaving the edge of your die a little bit off the edge of the score:


This ensures that you don't cut the edge of the card where the score line is.  I DID die cut first and then stamped afterwards.  Because the stamps are clear, it's rather simple to line up the stamp onto the die cut image.

To jazz them up a bit more, I stamped and die cut out the lid - using Smoky Slate.  I was going after an antique jar look - the kind with the zinc lids.  And because this set has thee most adorable little flowers, I stamped a bunch of those and added them too.  I went with a double color combo of Peekaboo Peach topped with Flirty Flamingo and then Flirty Flamingo topped with Melon Mambo.  It's fun to see how the colors react differently with each other as they dry. 


I think they turned out exceptionally cute!  I think I'll use the extras on other gifts besides my canned goods!  The fact that they came together quickly means that I can mass produce these! 

To finish off my "Gifts from the Garden," I topped the jars with circles of Fruit Stand DSP, then wrapped the lids with some of the new 5/8" Burlap Ribbon.  It's the PERFECT width for the edge of the lids!  YEAH!!!!  Tie the tag on and you've got an adorable gift.  Plus, it's DOUBLY handmade - so who's not to love it?


I hope that I've inspired you to do something a little out of the ordinary with your dies (you can create folding tags with MANY dies).  Now, it's time to continue to be inspired by the rest of our talented team!  Be sure to leave everyone a comment to show them some love!


http://www.stampinglane.com/2016/07/creation-station-blog-hop-gifts-from.html          http://justjulieb30.blogspot.com/2016/06/creation-station-blog-hop.html


Tuesday, June 7, 2016

Swirly Bird - The Sky's the Limit

 Hi all.....I've been dealing with computer issues for quite a while now, so finally bit the bullet and bought myself a new laptop.  I needed it - my old girl was about 10 years old, and had been thru 2 batteries.  However, I almost think it was just as hard to transfer all the files and programs from the old girl to the new one!  It took all day Friday, Saturday AND Sunday! It was a constant run, about 53 non-stop hours for the transfer alone - not including the hours of clean up needed first!  There are still some small things that I need to fix - like installing the gazillion fonts that I have....but I'm getting there and am loving the new 'puter.  Trying to learn a new operating system is a little bit of a challenge, but I'll get the hang of it by the time they come out with Windows 23. 

Even with all of the computer dealings, I whipped out a card today....This one from Swirly Bird.  It's a little bit of a copy of another card that I've created before (you can see that card here). 

I have a little funny thing to admit.  When I first got this set - I was not sure what this image was.  It comes as two different images so that you can stamp the stripes separately from the solid image.  But, it seriously took me a couple of weeks to figure out that putting the two of them together made a KITE!  Geez!  Blonde moment!
I used quite a few new In Colors - Dapper Denim, Sweet Sugarplum and Flirty Flamingo.  The background - so simple!  Sponge on some Pool Party to create a sky....then heat emboss some white clouds (from Balloon Celebration).  Top it off with your kites, kite strings and sentiment.  Finish it up with some splatters of Wink of Stella!  What's not to love?

Monday, June 6, 2016

Creation Station: New Catalog kick-off!!!


Howdy everyone!!!  It's the first Sunday of the month and that means that the Creation Station Design Team is ready to knock your socks off !  This month we are going to show you some great new products out of the NEW Annual Catalog!!!

Are you ready?


For my first card I went with the Swirly Bird set. I wasn't real sure about this set at first - there a re a few elements that I'm just not sure what they are..... But knew I could do some things with it that I'd be happy with. And I've been seeing some of these swirly flowers around the web for a while and have loved them. So....to be honest, I really just wanted the flowers....but there are a few other ideas floating around in my head!  Here's the card: 
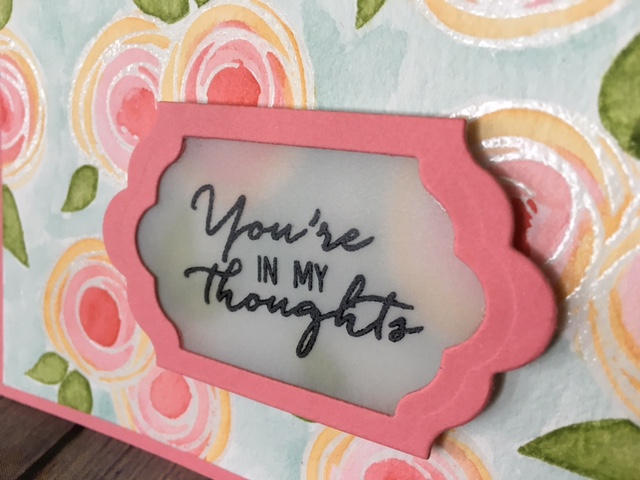
I simply heat embossed the small swirltly image using clear embossing powder on watercolor paper.  I did this randomly and spaced out a bit.  Then I created a mask and covered up the flowers that I'd already heat embossed, and stamped some more flowers, heat embossed those.  These all got colored using Watermelon Wonder, Flirty Flamingo, and Peekaboo Peach.  I went in and stamped some leaves, then used an Aqua Painter to soften them up, making them appear like they were water colored too.  Then I used some Soft Sky and watercolered in the background.


The sentiment comes from the Watercolor Wishes Card Kit. I stamped it on a piece of Vellum, and cut with the Lots of Labels Framelits.  Then I created a frame with the same Framelits using Flirty Flamingo card stock. I could hide my foam adhesive strips behind the frame and adhere to my card. 


My next card is pretty simple. I went with the Time of Year Hostess set, this set really does the work for you.  


I stamped the main sentiment on Whisper White, then die cut it with the new Layering squares  Framelits.  Added a black layering square with the scalloped edge behind it.  Then I stamped some of the flowers from the set in Flirty Flamingo and Daffodil Delight.


To create my background, I used a piece of gold polka dot dsp from the Pop of Pink Specialty paper and sponged on Blushing Bride, sweet Sugarplum, and Rich Razzleberry in an ombrĂ© fashion.  The gold polka dots will resist the ink.


I hope I've given you some new ideas......now it's time to travel to the next blog for even more inspiration!

http://theartfulinker.com/creation-station-blog-hop-catalog-sneak-peek-2016/         http://kkstamp.blogspot.com/2016/06/creation-station-new-product-showcase.html

Thursday, June 2, 2016

CAS(E) this Sketch Guest Designer!


I am beyond thrilled to be a guest designer over at the CAS(E) this Sketch blog!!!  This week there is a great sketch, and I had several ideas come to mind for this one.  But this card won over the other ideas that I had.

First up, the sketch:

There are just so many things you can do with this....I may post other ideas later this week before the sketch challenge is over. 

For now - this is it:

I've used a couple of the new Stampin' Up! In Colors - 2016-17.  The card base is made with the new Emerald Envy, and I also used that for the green in my rainbow.  The blue in the rainbow is Dapper Denim and the purple.....Sweet Sugarplum.  The other colors in my rainbow - Watermelon Wonder and Daffodil Delight.  Together, all of these colors made THEE perfect collection of a rainbow.  And where they blended together, the mixed in the most delightful way - absolutely no "muddy" colors at all!


Now - don't be too disappointed.   The stamp set and die are not from Stampin' Up!  I tried to make it work... but I went for this new Mini Make it Market kit from Papertrey Ink.  You could easily substitute this with the Over the Rainbow set from Stampin' Up! but I thought it had a child-like feel to it, and I wanted to send this card to a church member that just found out she has breast cancer.  So, I wanted a much more adult feel, and this just works so well. 

Lastly, I added some clear sequins in to mimic raindrops.

I hope that you enjoy this card - and am very thankful that CAS(E) this Sketch asked me to be their guest!  It was my honor!!!


Product List

Wednesday, June 1, 2016

June 1st! New Catalog goes LIVE today!


YAY!!!  It's a day to celebrate - the new annual Stampin' Up! Catalog is LIVE today!  You can click on the picture above to see it in it's entirety - or you can CLICK HERE to shop from it right now!

There are SO many great new products and lots of innovative things in this new catalog - prepare yourself for awesome overload!  I know that MY own wish list is enormous and the sticky tabs are sticking out of my catalog like little paper fireworks!  If you are in need of a physical catalog to hold in your hot little hands, please send me a message and I'll be glad to mail one out to you!

In the meantime.....I have a card to share - for real!  It's been a while as I've been focusing on some other things in my life....but I still love to create cards and other paper projects.  I'm hoping to find some balance between all that life has been throwing me.  Heck, I've been trying to find that balance for quite a while now.  I've prayed and am seeking guidance from above as to where I need to focus.  I know that God will guide me in the direction I need to be and I'll just keep pushing forward.  

So....for today's card....I don't have a lot for NEW things on this one...but I'll be sharing more NEW soon!


Some of you know that I've been selling my handmade goods (cards, 3-d items and wooden signs) at a local store.  I've been learning to make more than one card, as it seems an easier way to keep the store stocked!  

For this card, I created two versions - one Father's Day and one Birthday.  

 I started with a base of Island Indigo and stamped the Hardwood stamp in Whisper White.  I love the look that it creates - the white on blue....something a little unexpected, yet quite masculine.  

The deer image was watercolored with just 3 inks - Dapper Denim (you'll get a great sky blue from this when it's watered down), Soft Suede, and Old Olive.  Watercoloring is great when you have limited amounts of ink colors.  You can create so many more colors from one simply by adding more water or less water.  And using your ink refills helps achieve this even better because you get a little stronger concentration of color from a little drop.


For the sentiments - I used my rotary alphabet stamp - which is retired now.  However, the new Labeler Alphabet set will give you the exact same results, plus you'll be able to create longer sentiments. (I had to stamp this in sections because it wouldn't all fit on the rotary stamp)  The rotary stamp also didn't have an apostrophe, but the Labeler Alphabet DOES! plus many other symbols!

As my card was coming together, I was trying to figure out a good way to break up the background a bit - it was an awful lot of blue.  I peered over at the new Swirly Scribbles Thinlits that were on my desk and thought they would make a perfect grass hill.....and I think it worked quite well in the end!

Well - I hope you enjoyed today's card!  Go over and check out that new catalog - and if you need a catalog, be sure to send me a message and I'll get one out to you!


Product List